
I've been busy on and off with a few new beading projects and am preparing now for a journey home to Ireland. Eleven hours of traveling! I have started a couple of projects and now that the design elements are all worked out and all that's left is the execution and finishing, I have packed my trusty boxes and have enough work to keep my hands and mind busy on the long journeys beginning this coming weekend.
I feel I have a 'foolproof' travel kit that suits MY needs! I know we are all different, but when I travel it's with some beadweaving work, and I usually take at least two projects with me. I don't like to 'design' as such when I'm flying or in the passenger seat of the car ... but I find that say a spiral rope or a bracelet base that I'm working on is an ideal travel-type project.
I actually use some nifty plastic photo-storage boxes that can be purchased at Michaels or Hobby Lobby. They come in a container with either six or twelve individual photo-storage boxes. (I also use these boxes to store my seed beads and as much as I can, I keep the beads in their original tubes ... the six inch tubes fit comfortably into the boxes.)
To get back to the 'travel kit' though I use a little Beadalon blue sticky mat that sticks to the bottom of the plastic box, and I have come to love these. The beads 'stick' to the blue mat, but are very easy to lift up with the needle ... there is no residue. The major advantage is that if you hit some turbulence and the 'box' is upset, the beads do not go all over the place.
I can fit my magnifying reading glasses, a small safety blade (tucked under the blue mat), necessary tubes of beads and thread bobbins. I take a little multi-tool in case I need the pliers to pull the needle through the beads. A few needles will stick quite nicely to the blue gel mat. Over the year I'll have a few 3-4 hour plane flights and one 'container' can keep me going for these hours.
These plastic containers are about an inch thick and measure approx. 4.75" x 6.75"
I can easily put one of these containers into my purse or slide it into my laptop bag or camera case, depending on what my hand luggage consists of. They seal beautifully and even the loose 15/0 seed beads that I so love remain safe and sound inside.
I have mastered the art of keeping this on my lap as I bead, and is SO easy to just close up if I need to put it away in a hurry.
This is MY solution and of course may not work for everyone -- but I thought I'd share in case this might appeal to someone.
Beading calms the nerves!!
I've written from time to time about the calming effect beading has for me. Well once again I've put this theory to the test, albeit unwillingly! Today my poor hubby was not feeling well when out working -- he was on a roof seeing to some equipment and it was 92 degrees here today! When he spoke of "tightness" in his chest, I was aware of the implications, and after phoning his doc, she said he should go to the ER for some testing. Needless to say I grabbed a tube of beads and my trusty travel box, so that my fingers could at least be busy during the time at the Emergency Room with him. I hate to have nothing to do, as wasting time (which is so precious to me) is something that does NOT sit well with me at all. I just started a RAW bracelet base that was soothing, mindless repetition but with a purpose to it, and so was once again grateful to the beads for calming my spirits.
Finishing what I've started!
After an Easter Weekend with ALL of my family in town and together for many meals (how cool is that?!) I did finally get to go shopping for some beads to add to and help finish the copper and cameo necklace. However, before I purchased the much-needed beads, I got back to finishing off a necklace for another of the Alphonse Mucha Cameos I created a number of weeks ago. I really love these and am delighted with the finished cameos! Who'd have known that working with the epoxy resin could yield such terrific results?!
Initially my thought was to work a spiral rope for this Mucha cameo, but I ended up using a new stitch for me, which is based on a simple Chevron Chain, but was actually created as I worked with the beads! I am just SO pleased with the outcome. The necklace 'strap' is so very fluid and the stitch allows it to sit beautifully without having to worry about it curving around the neck.
  There is a lot of movement in the stitch! I think it suits the cameo/pendant which is ornately stitched around the cameo, but simply finished because of it's larger size. I am delighted that this necklace is now complete.
I also finished the copper and cameo necklace (I love it!) that was inspired by my 'Use the Muse' entry.
Over the weekend I picked up the bead-embroidered strip which was to be my first embroidered bracelet and decided, despite the fact that I felt I could have done SO much of it differently, to simply go ahead and finish it. I learned a lot from that exercise -- particularly where finishing and edging the bracelet is concerned. I used a metal blank for the cuff and backed it with black Ultrasuede. There is still much room for improvement and I'm looking forward to my next bead-embroidered piece.
Initially my thought was to work a spiral rope for this Mucha cameo, but I ended up using a new stitch for me, which is based on a simple Chevron Chain, but was
 actually created as I worked with the beads! I am just SO pleased with the outcome. The necklace 'strap' is so very fluid and the stitch allows it to sit beautifully without having to worry about it curving around the neck.
  There is a lot of movement in the stitch! I think it suits the cameo/pendant which is ornately stitched around the cameo, but simply finished because of it's larger size. I am delighted that this necklace is now complete.
 I also finished the copper and cameo necklace (I love it!) that was inspired by my 'Use the Muse' entry.

Over the weekend I picked up the bead-embroidered strip which was to be my first embroidered bracelet and decided, despite the fact that I felt I could have done SO much of it differently, to simply go ahead and finish it. I learned a lot from that exercise -- particularly where finishing and edging the bracelet is concerned.
 I used a metal blank for the cuff and backed it with black Ultrasuede. There is still much room for improvement and I'm looking forward to my next bead-embroidered piece.
Celtic Trefoil -- lessons learned
Well today the sun is shining and my heart is skipping along with the happiness and personal satisfaction that comes with success! YES I did it! FINALLY!! My most recent Trefoil tribulations have all been resolved and ALL because of the fact that I used the CORRECT THREAD! I am happy to say that simply switching to the Nymo thread that Diane recommended has meant that the latest Trefoil efforts are very successful.
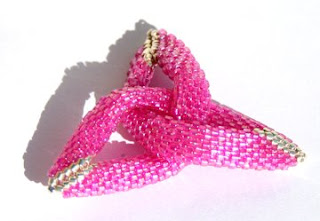
I started Trefoil #5 (!!) with the Nymo thread and some burgundy delicas and trimmed these with silver Toho Treasures, and although I could see where some
adjustments might make an improvement, I have to say I was very confident of a successful outcome, as I worked through the pattern. There is a certain amount of 'give' or stretch in this thread that is essential to the success of the design. Without this flexibility there is no hope of a successful outcome. Filled with the joy of the burgundy Trefoil I then went on to use the olive/pink 133 delicas my local bead store owner suggested, and love the colors. There's a pretty pink sheen to these beads that is not that obvious when photographed in the sunshine.

I stitched some lovely copper seed beads on the outer edges, after zipping the two layers together and am delighted with the finished item. I learned from making the burgundy Trefoil to add an extra copper bead at the three points -- it makes all the difference!
At some point in the future I'll incorporate the Trefoils into a necklace.
MANY thanks to Diane for her encouragement, which I so appreciate.
I started Trefoil #5 (!!) with the Nymo thread and some burgundy delicas and trimmed these with silver Toho Treasures, and although I could see where some

adjustments might make an improvement, I have to say I was very confident of a successful outcome, as I worked through the pattern. There is a certain amount of 'give' or stretch in this thread that is essential to the success of the design. Without this flexibility there is no hope of a successful outcome. Filled with the joy of the burgundy Trefoil I then went on to use the olive/pink 133 delicas my local bead store owner suggested, and love the colors. There's a pretty pink sheen to these beads that is not that obvious when photographed in the sunshine.

I stitched some lovely copper seed beads on the outer edges, after zipping the two layers together and am delighted with the finished item. I learned from making the burgundy Trefoil to add an extra copper bead at the three points -- it makes all the difference!
At some point in the future I'll incorporate the Trefoils into a necklace.
MANY thanks to Diane for her encouragement, which I so appreciate.
Continued adventures with Diane's Celtic Trefoil
I was encouraged to contact Diane Fitzgerald herself and with some trepidation I did just that! I was pleasantly surprised to receive a VERY gracious email reply from Diane shortly after sending the email. What a lovely lady! I sent Diane the photos of my initial attempts and her suggestions have to do with using the actual thread she recommends (I have not been doing that) AND playing a little with the tension to get the desired effect.
Well I sure wish I'd more time to devote to this, but I've done what I can and have not yet achieved success. Attempt #4 was going well until the first layer was mostly complete and ... one of the beads on the base row broke!! Can you believe it? In an attempt to keep the initial tension tight, I overdid it. My balloon burst and of course that was the end of that. I don't think I've ever worked as hard to achieve an outcome as I have with this, but I AM determined to master the pattern.
I DO need to shop for some more delicas, and make sure I am using the PERFECT thread -- so after the weekend I'll take up the needle again and give this lovely pattern another go!
Pleasantly side-tracked -- Diane Fitzgerald's new book!
Since 'discovering' seed beads, I've long admired the work of many talented beaders and have learned a lot from reading beading magazines and books. One of my most recent acquisitions is a copy of Diane Fitzgerald's latest book titled Shaped Beadwork. I feel that tackling ANY of these patterns will challenge me utterly, but understanding just what can be accomplished with the various stitches is surely part of exploring beadweaving. Diane's style is unique and easily recognizable and I've long admired her Celtic Trefoil in particular! One of the things on my bucket list is certainly to make a necklace using these marvelous shapes as they certainly appeal to my Celtic soul!
When the book arrived I was smitten and felt I just had to at least take the first step toward learning to make the Trefoil and so I did as instructed (yes -- I know -- I DID actually follow the directions!!) and completed a couple of the oval links beforehand. This exercise is essential to understand the construction of the 'corners' and also to see how the 'step-up' in the second layer of the Trefoil is accomplished.
SO FAR I've made three good attempts at making the Trefoil and to date I'm disappointed with the outcomes. My first attempt was accurate with regard to technique and pattern but it would not sit correctly at all. There's only so much 'give' with these lovely glass delica beads! That effort, although completed, I cut up -- and with the beads started on Trefoil #2. THIS time I noted the importance of the tension and actually worked rather loosely as I got to the outsides of the piece -- loose tension is NOT something I'm used to in peyote stitch! BUT the end result was "better" . . . NOT perfect though!

Even at this stage I could see that the work was not laying flat enough to continue with the second layer. I DO love these Delica beads, though! So at this point I added some copper seed beads to the outer edges, and I feel this is 'usable' although not all it could be! I still felt it was all down to tension so I tried it again. This time I used Toho Treasure beads in pink and silver and was very attentive to the tension and holding the piece so that the second layer was folding over as I worked -- as the finished piece should. It all LOOKED good enough to work
until it was zipped up, and even THIS time I felt it was not sitting flat enough. I was frustrated with this and am now looking for some constructive guidance as I am sure I'm missing something but cannot for the life of me figure out what it might be! I will reach out for some help and see what happens!
When the book arrived I was smitten and felt I just had to at least take the first step toward learning to make the Trefoil and so I did as instructed (yes -- I know -- I DID actually follow the directions!!) and completed a couple of the oval links beforehand. This exercise is essential to understand the construction of the 'corners' and also to see how the 'step-up' in the second layer of the Trefoil is accomplished.
SO FAR I've made three good attempts at making the Trefoil and to date I'm disappointed with the outcomes. My first attempt was accurate with regard to technique and pattern but it would not sit correctly at all. There's only so much 'give' with these lovely glass delica beads! That effort, although completed, I cut up -- and with the beads started on Trefoil #2. THIS time I noted the importance of the tension and actually worked rather loosely as I got to the outsides of the piece -- loose tension is NOT something I'm used to in peyote stitch! BUT the end result was "better" . . . NOT perfect though!

Even at this stage I could see that the work was not laying flat enough to continue with the second layer. I DO love these Delica beads, though! So at this point I added some copper seed beads to the outer edges, and I feel this is 'usable' although not all it could be! I still felt it was all down to tension so I tried it again. This time I used Toho Treasure beads in pink and silver and was very attentive to the tension and holding the piece so that the second layer was folding over as I worked -- as the finished piece should. It all LOOKED good enough to work

until it was zipped up, and even THIS time I felt it was not sitting flat enough. I was frustrated with this and am now looking for some constructive guidance as I am sure I'm missing something but cannot for the life of me figure out what it might be! I will reach out for some help and see what happens!
Exploring RAW a little more, and using some metal inserts
Having finished the little RAW bracelets and brought some joy to a couple of special people, I actually made one in a lime green -- a color I love to wear! This is simple and yet so much fun to wear! What I like best about this little bracelet is that it fits so comfortably and does not 'get in the way' at all. 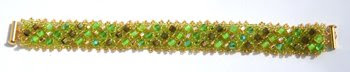 My daughter loves this design as she can wear it to work and type away quite happily!
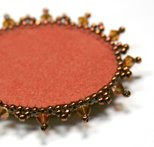
Before putting the RAW away for a while (I still have two commission pieces I'm working on LOL) I wanted to use what I'd learned in constructing the Right Angle Weave base,

and so played with some beads and pearls to construct a circular necklace focal. I then added some seed beads to attach this to some small antiqued brass metal pieces I ordered on the internet and so the necklace 'grew.'

I am truly happy with the result -- can already see some more variations that I'd love to try but once again MUST mention that there are NEVER enough hours in the day!
 My daughter loves this design as she can wear it to work and type away quite happily!
Before putting the RAW away for a while (I still have two commission pieces I'm working on LOL) I wanted to use what I'd learned in constructing the Right Angle Weave base,

and so played with some beads and pearls to construct a circular necklace focal. I then added some seed beads to attach this to some small antiqued brass metal pieces I ordered on the internet and so the necklace 'grew.'

I am truly happy with the result -- can already see some more variations that I'd love to try but once again MUST mention that there are NEVER enough hours in the day!
Building on the Muse experience part two!
Well I've worked some with one of the copper pieces I purchased and have decided to use one of my resin cameos with it.

SO far, I've added some bead detail to the copper filigree piece

and have also added a bezel to the cameo.
I'm very happy with the way these have turned out and am working away to attach these to a beaded necklace -- I will need to find a more perfect series of beads to pull out some of the orange color in the cameo. So this is on hold, pending a trip to my favorite local bead store!

SO far, I've added some bead detail to the copper filigree piece

and have also added a bezel to the cameo.


I'm very happy with the way these have turned out and am working away to attach these to a beaded necklace -- I will need to find a more perfect series of beads to pull out some of the orange color in the cameo. So this is on hold, pending a trip to my favorite local bead store!
Subscribe to:
Posts (Atom)


